Pages

Tuesday, November 30, 2010

Create Image files from MS SQL Image Data Type with Powershell

Today my brother Patrick asked me to pull pictures from our ID badge System to be used for Active Directory. I found that the images where stored in a Microsoft SQL 2000 instance as the image data type. After some work with Powershell I was able to to recreate the Image file from the SQL data. This example is of course a simplifed version but should be easy enough to modify for your needs.

$picture_ID = 1
$file = "c:\image.jpeg"
$sqlserver = "DBServer"
$SQLCommand = "Select image 
  From ImageTable
  Where ID = '$picture_ID'"
#note image is an SQL Type "Image"
$SqlConnection = New-Object System.Data.SqlClient.SqlConnection
$SqlConnection.ConnectionString = "Server=$sqlserver;Database=master;Integrated Security=True"
$SqlConnection.Open()
$SqlCmd = New-Object System.Data.SqlClient.SqlCommand
$SqlCmd.CommandText = $SQLCommand
$SqlCmd.Connection = $SqlConnection
$dbname = $SqlCmd.ExecuteScalar()
$SqlConnection.Close()

Set-Content -path $file -Value $dbname -Encoding Byte 
start $file #open the file to view if its correct.

In my case I didn't know the files were jpeg but used http://www.sqlimageviewer.com/ to first see what type of tiles they are. Then change the file extension. Also the trial was sufficient for this, no need to buy it.

Additionally I modifyed a fuction from Jason Fossen to demo the return array when it was returned as a string to create a byte array and

function Convert-HexStringToByteArray {
Param ( [String] $String )

#Clean out whitespaces and any other non-hex crud.
$String = $String.ToLower() -replace '[^a-f0-9\\\,x\-\:]',''

#Try to put into canonical colon-delimited format.
$String = $String -replace '0x|\\x|\-|,',':'

#Remove beginning and ending colons, and other detritus.
$String = $String -replace '^:+|:+$|x|\\',''

#Maybe there's nothing left over to convert...
if ($String.Length -eq 0) { ,@() ; return } 

#Split string with or without colon delimiters.
$String -split '([a-f0-9]{2})' | foreach-object { 
 if ($_) {
   [System.Convert]::ToByte($_,16)  
 }
} 
}

$file = "c:\image.jpeg"
$img = "0xFFD8FFE000104A46......" #excluded the rest for size reasons
$ba = Convert-HexStringToByteArray $img
Set-Content -path $file -Value $ba -Encoding Byte 
start $file #open the file to view if its correct.

Monday, November 29, 2010

Create LTO Barcode Labels

This post is more for my own memory than yours. A while back I needed to reuse some LTO cleaning cartridges. However the IBM Tape Library we use needed LTO bar codes on the tapes and they didn't have any.  I priced the labels and found the it way overpriced for simple barcodes. Rather than spending the money I followed the post here on how to create the needed LTO bar codes.

The reason I'm posting this is because it happened again with new cleaning cartridges that got ordered with out labels and I had to find out to print them again.  I did find a few products that would create the labels  and print them however they weren't free and I only needed about 10 labels.

Site what we followed: http://rogierg.blogspot.com - 80 bucks for LTO barcodes? WTF?
Create Barcodes Site: http://www.barcodesinc.com/generator/index.php

Settings for the LTO Barcode
LTO Barcode Creation


After you generate the barcode, right click the image and "Save image as" and save the jpeg. Print the label and carefully tape it to the LTO Cartridge. Be careful that there is no way the barcode can come free or hang in anyway.

Tuesday, November 23, 2010

VMware View 4.5 - Removing the linked clone references from the View Composer Database

In an earlier post I referenced Manually deleting linked clones or stale virtual desktop entries from VMware View Manager. While following that KB my self I found removing references from the View Composer database to be to much of a manual process and double so when removing multiple machines in a pool. I went looking on line and found nearly what I wanted from wanted from andga.

I made just a few changes to what andga wrote so that it would work work with the BaseName and will remove the references from all tables based on the name. By using sql 'like' and '%' it finds all the matching VM and cleans them all up at once.

DECLARE @vmdelete varchar(20);
set @vmdelete = 'VM_BaseName%';

delete from SVI_VM_NAME where NAME like @vmdelete
delete from SVI_COMPUTER_NAME where NAME like @vmdelete
delete from SVI_TASK_STATE where SIM_CLONE_ID in (SELECT ID FROM SVI_SIM_CLONE WHERE (VM_NAME like @vmdelete))
delete from SVI_SC_BASE_DISK_KEYS where PARENT_ID in (SELECT ID FROM SVI_SIM_CLONE WHERE (VM_NAME like @vmdelete))
delete from SVI_SC_PDISK_INFO where PARENT_ID in (SELECT ID FROM SVI_SIM_CLONE WHERE (VM_NAME like @vmdelete))
delete FROM SVI_SIM_CLONE WHERE (VM_NAME like @vmdelete)

After using this or manually editing the SQL in the View Composer DB be sure to restart the VMware View Composer Service.

Links

VMware View 4.5: Specified AD container partial distinguished name is not valid

Update 9-1-2011 with View 4.6 - Ran into this problem again, it seems that if you change the creds in view that they don't take effect very quickly. I made a change to the creds for the vSphere one day and 2 days later recomposing started giving the "Specified AD container partial distinguished name is not valid"  again. Check the AD permissions on the OU you have the View VM's added to with this post by Vmware. Also it was creating the AD objects then failing, as clean up Manually deleted those objects from AD.

Today I kept getting the following in error in VMware View 4.5 when trying to provision VMs.
Specified AD container partial distinguished name is not valid.
When provisioning VMware View Pools. I've ran into it error before and last time i was in a hurry and created a new pool to get around the problem. However I finally narrowed it down several causes today.
  1. Follow the Logs. For more detailed information checkout "\\VSphereServer\c$\ProgramData\VMware\View Composer\Logs\vmware-viewcomposer.log" for additional detail about the error.
  2. Is the Value correct? If your like me you used the GUI to set this value so it seems unlikely its incorrect.  
  3. Does that account specified have access to add machines to that OU and is the password correct. Both are easy to check, as the password might have changed or the like.
  4. Did the Computer already exist in AD? If your recomposing the machine you may need to delete the already existing AD object and then see if it can recreate it.
  5. Have you rebooted the View Composser Server? I found that while the services were up I needed to reboot it once in a while. I don't know why this is and it shouldn't work but I found that it did. Wish i could tell you more on why this works some times.
  6. Try Removing it from the LDAP ADAM instance, the DB, and View before provisioning it. Manually deleting linked clones or stale virtual desktop entries from VMware View Manager
If unsure how to connect to the LDAP Instance look to my other post.

If you are seeing the following also follow the Manually deleting linked clones or stale virtual desktop entries from VMware View Manager link. You may need this post if your deleting references from the View Composer database as it will automate the process for you.
Desktop Composer Fault: 'Virtual Machine with Input Specification already exists


Links

Unprotect or Delete VMware View Replicas

7/20/2012 Update: The below post pertains to pre view Composer 3.0. See this document for more information.

Ever have a VMware View Replica shown in vSphere Client but unable to move, edit, or delete it? I have.  First assume you really know what your doing and you need to modify it. Normally VMware View attempts to protect you from yourself and protects your replicas, even from you. But sometimes you may need to mofity them anyway and to do so you'll need to remove the protection.

To do this you will need to use the SviConfig Command on the View Composer server. The Syntax on it usage isn't to hard but the inventory path wasn't very clear. Thus the  problem is figuring out the syntax in order to remove the connection. As a Solution   This is a Powershell script that will display the correct syntax to remove the VMware View Protection from the replica. SviConfig usage for unptotectentity are as follows:
sviconfig -operation=unprotectentity
          -VcUrl=https://<VirtualCenter address>/sdk
          -Username=<VirtualCenter account name>
          -Password=<VirtualCenter account password>
          -InventoryPath=/<Datacenter name>/[vm|host]/<folder name>/<vm name>
          -Recursive=[true|false]

What I wrote is a powershell Script that generates the unprotect commands. The script requires the VMware vSphere PowerCLI to be installed but doens't have to be run from the View Composer server. This script only creates the commands, it does not execute sviconfig in anyway.  Instead it Creates the commands and puts them in a text file then shows you the text file.

Download UnprotectVmwareViewReplicas.ps1

Example Output
Output of Unprotect Replicas Commands 

Monday, November 22, 2010

How to Connect to VMware View's LDAP Instance with AdsiEdit

As part of my VMware View 4.5 setup I've needed dig into the LDAP instance that Vmware View uses. In case you didn't know Vmware View usesa  LDAP instance (using Microsoft's ADAM) to allow additional connection Servers to be used to provide high‐availability and load balancing.  The connection is easy enough with adsiedit.msc if know if you know the Naming Context.

I warn you to manually edit this LDAP at your own risk.
  • From a server or Desktop that has the AD tools installed run  adsiedit.msc from a console window or Run prompt.
  • Right click ADSI Edit and then connect to...
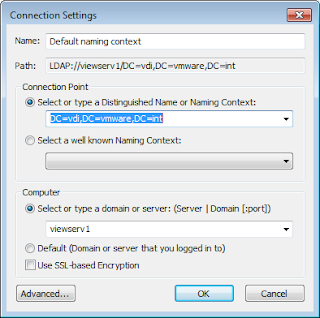
  • Change the Connection Point to DC=vdi,DC=vmware,DC=int
  • Select the the Computer and enter the name of your VMware View Host.
AdsiEdit Connection Settings for VMware View 4.5

Thursday, November 18, 2010

Emulex 10 Gb CNA Crash - VMware and Windows Update 1

Following up a previous post of mine on our Emulex 10 Gb CNA problems and crashes. I figured I'd take a minute and update the list of working driver builds we've used  for VMware ESX hosts.

  • Version: be2net-2.102.486.0
    • VMware ESX Versions: 4.0 and 4.1
    • ISO: esx-4.0.0-GA-be2net-2.102.486.0.iso
    • Release: Beta
    • Verdict: STABLE
    • Obtained: Our Networking Admin got it emailed from Emlex Systems Engineer  
  • Version: be2net-2.102.474.1
    • VMware ESX Versions: 4.0 and 4.1
    • ISO: esx-4.0.0-GA-be2net-2.102.474.1.iso
    • Release: Beta
    • Verdict: STABLE
    • Obtained: Our Networking Admin got it emailed from Emlex Systems Engineer  
    • Obtained on: 9/20/2010

Wednesday, November 17, 2010

VMware View 4.5 - Configuring the Local Account on the Thin Client (Part 3)

This post is part of a Series of Posts
Configure ViewUser Account and the Shell Replacement
Now login to the ViewUser account. We want to change the Shell, so that when this account is logged all they can see is Vmware View Client. But first some housekeeping. Run this command from PowerShell so that our unsigned script is allowed to execute on this account.

Set-ExecutionPolicy -scope Currentuser -executionPolicy Unrestricted

Now navigate to the folder we placed the script file in. Right click VMwareViewShell.ps1 and choose "Run with PowerShell". It should launch the VMware View Client and proceed to the username and password Screen.

You should be able to login and view your VMware View Desktop, test that and USB redirection. If the script is working correctly you should be able to close the VMware View Client it should relaunch self and clear the username and recenter it to the screen. Continue testing till your satisfied  that the script works correctly. Once it does we can now replace the explorer shell with the script instead. To do this we need to make a registry change.

Friday, November 12, 2010

Dell Remote Access Controller 6 (iDRAC6) authentication with Microsoft Active Directory

Today while trying to setup some new Dell R810 DRAC's to use Active Directory for Authentication. However I kept getting the following errors.
Environment 
  • iDrac version 6
  • Schema Selection: Standard Schema 
  • Certificate Validation Enabled: No
The useful part of the error when testing the Directory Service Settings. 
user=(Username), host=(DCFN)
16:07:25 Connecting to ldaps://[(DCFN)]:636...
16:07:25 ERROR: Can't contact LDAP server, (null):
Please check the following things:
- the correct Certificate Authority (CA) certificate has been uploaded to iDRAC
- the iDRAC date is within the valid period of the directory server and CA certificates
- the LDAP server address configured in iDRAC matches the subject of the directory server certificate

16:07:25 Connecting to ldaps://[(DCFN)]:3269...
16:07:25 ERROR: Can't contact LDAP server, (null):
Please check the following things:
- the correct Certificate Authority (CA) certificate has been uploaded to iDRAC
- the iDRAC date is within the valid period of the directory server and CA certificates
- the LDAP server address configured in iDRAC matches the subject of the directory server certificate
user=(Username), host=(DCFN)
Solution
The issue stood out when reading the following Frequently Asked Questions.
Question: Does iDRAC6 always use LDAP over SSL?
Answer: Yes. All the transportation is over secure port 636 and/or 3269.
Our Domain Controllers didn't allow LDAP over SSL (LDAPS). The errors didn't come up in Google search so may this help someone else.
See my other post on how to enable LDAP over SSL: Enable LDAP over SSL (LDAPS) on Windows 2008 Active Directory Domain
Links
http://support.dell.com/support/edocs/software/smdrac3/idrac/idrac10mono/en/ug/html/racugc7.htm#wp53492

Enable LDAP over SSL (LDAPS) on Windows 2008 Active Directory Domain

Today I did some work on getting our Dell Remote Access Cards (DRAC) to use Active Directory for authentication. The cards only supported LDAPS so after looking into it I realized my Domain Controller's didn't do LDAP over SSL (LDAPS).

So after some work on it here’s the solution to enable it. I found a few posts on line but they didn't seem to be written very clear for a environment with a Certificate Authority(CA) not on a Domain Controller (DC).

I found that all you really have to do is give the DC the correct type of certificate and it will automatically do LDAP over SSL. An important requirement here is that I didn’t want to force connections to use LDAP over SSL but rather just enable it to work if something wants to use it.

Environment
Microsoft Active Directory: Windows 2008
Certificate Authority: Windows 2008 Server that is not a Domain Controller

Solution


Enable The Domain Controller Authentication Certificate Template on the Certificate Authority
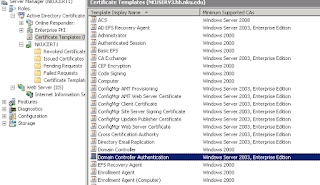
Starting with your Certificate Authority (CA) we need to make sure that the Domain Controllers (DC's) can enroll with the CA in order to obtain the correct Certificates. There is a Certificate Template for this that exists by default. To configure this Logon to the CA and open Server Manager and then expand the roles till you get the view below.
  • Expand the tree till you see the Certificate Templates folder and look for the Domain Controller Authentication the default existing template.
  • Then expand the CA server and check if its listed under its Certificate Templates folder as well. If the Domain Controller Authentication is listed in both places then it exists and is enabled. If it isn't under the CA's Folder then we need to enable the Domain Controller Authentication Certificate Template.
  •  Right click Certificate Templates under the CA, Click New, then and Click Certificate Template to Issue. Select the Domain Controller Authentication and then click OK.

Thursday, November 11, 2010

VMware View 4.5 - Building the Windows 7 Thin Client (Part 2)

Note: that this works with all View Client versions View 4.5, 4.6 and 5.0.

Update 4-4-2011- Added the scripts and the fix windows size Powershell shell.

This post is part of a Series of Posts
The this guide will walk you through building a Thin Client will have the following details.
  • Running Windows 7
  • Using the PCoIP Protocol
  • User authentication based on AD
  • The Thin Client will have a replaced shell to limit the users to VMware View Client only.
  • The Client can be configured to use a particular Pool or offer the user any they have access
Thin Client OS Install
The Thin Client only needs to be protected and run VMware View. The OS is about the only software we need installed and I'll be reploying clones of this machine so I only plan to build it once by hand. Starting with a formated machine that's same as the hardware it'll be running on in the lab. I run a fresh Windows 7 install from DVD. After the Install with normal options for your enviroment. I make the following changes.
  • Updates service configured to auto update and download other microsoft updates
  • Install all possible Microsoft updates
  • Update any drivers
  • Disable UAC
  • Set for best performance
  • turn off system restore points
  • Enable remote desktop.
  • Stop and disable the Themes Service
  • Check that the newest version of  Powershell is installed
  • Change Power settings
    • Don't password protect awaking from sleep
    • Let Sleep monitor and/or machine
Creating a ViewUser and Changing its Shell

We need a Local User that we will use to run VMware View Client from. We could have users log in as themselves but I didn't for a the following reason. If we make users login to Windows. They would login to the machines, profile would be created, then View Client Launched, Authentication is passed, then finally the user is prompted for what VM they would like to access. After they select it they have to wait for it to login and create another profile. Very time consuming. We can skip all of the first profile copy issues by createing a already logged in local user. So Instead lets create the local user.

Tuesday, November 9, 2010

Powershell.exe - Passing Command Arguments with Spaces

This isn't the first time I've run into this problem but the first good solution I've found. When wanting to execute a PowerShell.exe a file the spaces in the file path it can be problematic. However the normal methods of passing arguments fail. I've tried ticks, double quotes, single quotes, backslashes however nothing work.

An example of what fails.
powershell.exe -Command "c:\path with space\script1.ps1 arg1"

However by using the "& - call operator" you can successfully.

This example works.
powershell.exe -Command "& 'c:\path with space\script1.ps1' arg1"

Note: When passing the command line argument "-WindowsStyle" to powershell.exe you have to place it before the "-Command" argument. If "-Command" comes first "-WindowStyle" doesn't work.

Here's an example
powershell.exe -WindowsStyle Hidden -Command "& 'c:\path with space\script1.ps1' arg1"

Side Note: After posting this my brother was like "Of course thats the way around it" and I've swear i asked him the last time it came up.

Links
http://www.leeholmes.com/blog/2006/05/05/running-powershell-scripts-from-cmd-exe/

Tivoli Storage Manager Client Install Script using Powershell

Below is the Tivoli Install Script that I wrote to install, update, or configure Tivoli Storage Manager Clients. It works great but inorder to use it you have to setup a network share with a few things. All the files listed are necessary files and are shown in the picture.

  • IBM TSM Client Install Folders - The name matters and is used in the scripts. 
  • TSM Client Install Script.ps1 - Its given below. Just save to txt file.
  • dsm.opt - set with your normal server settings, values can be set that the script will replace. Example given below.
  • tsmjbbd.ini - the jornal service file. Must use or alter the one used below.

TSM Client Install Script Share
Be sure you edit the TSM Client Install Script.ps1 Configuration Parameters section for your environment. Also check that you either use your dsm.opt file or edit the example to match your environment.

Saturday, November 6, 2010

Password Manager Pro Commands for Trouble Shooting

A small post on the command to launch  Password Manager Pro from a console instead of a service.  Sounds simple enough but most things are after you figure them out. Launching it this way give you better error reporting than just the logs.

Commands to Start the DB and Website
REM open Install directory
cd "\Program Files (x86)\PMP\bin" 
Startdb.bat 2345
pmp start
WARNING!! This command will wipe the Database and any passwords or resources! Besure you have working backups.
pmp reinit

Friday, November 5, 2010

Sysprep 0x8007139f Error on Windows 7

For those of you keeping track the Sysprep issues continue.

While finishing up a windows image and after the previous Sysprep CopyProfile (also worth a read if unsure how to debug sysprep problems) issues. I ran into another sysprep error in C:\Windows\Panther\UnattendGC\setupact.log with error "Failure occured during online installation. Online installation cannot complete at this time.; hr = 0x8007139f"  This was the format of the file.

[windeploy.exe] WinDeploy.exe exiting with code [0x0]
[windeploy.exe] ------------------------------------------------
[windeploy.exe] WinDeploy.exe launched with command-line []...
[windeploy.exe] Setup has not completed, adding pending reboot.
[windeploy.exe] SetupCl has pending operations; blocking deployment process until they've been completed.
[windeploy.exe] Failure occured during online installation.  Online installation cannot complete at this time.; hr = 0x8007139f
[windeploy.exe] Flushing registry to disk...
[windeploy.exe] Flush took 344 ms.
[windeploy.exe] WinDeploy.exe exiting with code [0x8007139f]
[windeploy.exe] ------------------------------------------------

Looking into the issue it appears to be a not so uncommon issue with Windows 7. However most people seem to oddly go about testing for the cause by testing every piece of software on the box one at a time.

The Problem
The issue is linked with registry keys that appear to cause problems for sysprep.
  • The System doesn't have full access to some registry key.
  • A registry key is larger than 8 Kb.
  • Registry is corrupted in some way.
The Solution
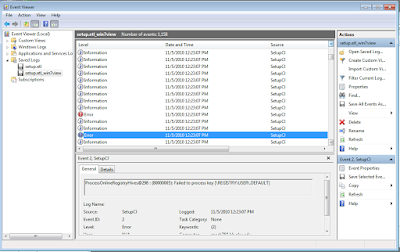
While the normal setupact.log is enough for most sysprep problems for this one we have to read the file "C:\Windows\Panther\setup.etl". To do so copy the file to a machine where can open Windows Event Viewer and use Open Saved Log. We didn't use notepad due to the format of the file not being very human readable. It can be done but but why.
setup.etl from machine with 0x8007137f error.
Once you have the log open, look for errors. Mine was 6 errors in a row. All containing and repeating with descendant registry paths:
SclRegProcessKeyRecursiveByHandle@330 : (80000005): Failed to process reg key or one of its descendants:

In my case they all were from [\REGISTRY\USER\.DEFAULT\] and its descendants.

The Fix was to restore my machine to previous state before  sysprep was run (VMware Snapshot in my case). Download Windows 7 and Windows 2008 Hotfix KB 981542 (http://support.microsoft.com/kb/981542/). Then rerun sysprep with the same file which ended successfuly.

Others have reported that this hotfix didn't solve this problem for them. In those cases you should be able to narrow down the cause based on the Registry key listed in the "Failed to process reg key or one of its descendants" error.

Links

Thursday, November 4, 2010

Using Sysprep with CopyProfile in Windows 7 and Windows Server 2008

First rule of testing a sysprep unattened file:

Thou shall test your unattend xml file on a newly unconfigured OS install before blaming the file.

The Reason: Before becomeing a server admin I made my way by developing new and better ways to deploy computers on campus. I moved to the server team before Vista came out so my experitise was in mostly with Windows XP. So recently after 5hrs of trying to do the once simple task of copying the administrator profile to the default profile I can say that things have changed.  First let me setup what I'm working on, then share what can so you can avoid the problems I had.

The Goal: To use the <CopyProfile> option with sysprep to copy the Administrator profile to the default profile on a Windows 7.

The Problems: Things that can go wrong will.
  • If your using a Virtual Machine that some one else built, you don't know what they did or didn't do. In my case my brother built a tweaked Virtual Machine for Windows 7 stripped for speed. At some point he made the profiles/registry gods upset and sysprep no longer can listen to the <CopyProfile> option. See here for fix. 
  • You need to be able to read the local disk Incase the box will not boot or in this case gets stuck in a sysprep endless boot. I can't over state this. You can not see whats wrong with sysprep with out this. In my case I used a network PXE server with WinPE loaded with VMware Drivers. However note that PXE doesn't work with VMXNET3 and ESX 4.1 as of yet. See my other post.
  • Sysprep isn't your friend, its more of the coworker you have to deal with. Learn to get along with it as its not going anywhere. 
The Solution
The only truly supported way to copy a profile in Windows 7 to the default to do so by using Sysprep to do the Profile copy. If you search the web many people list ways but they shouldn't be used in real production environments and require manually editing the registry files. And honestly you don't should need these shortcuts as doing the copy via sysprep is easy enough if you follow this post.

First configure the Administrator Profile to the way you want. Make sure you opened most programs and everything works. I'm not going to go through the finer points of this and may make a post on it later and link to it here.

VMware VMXNET3 Driver with WinPE

Today working with View I found out that the VMWare VMXNET3 Nic Type won't allow you to boot to a WinPE even if the driver has been added to the WinPE. I did read that this would be fixed in ESX 4.1 Update 1 but I couldn't confirm that.

The very second that the WinPE starts to download this error is given with the VMXNET3 Nic.

This was picture was taken on from our ESX 4.1.0 environment.

Instead use the E1000 Nic Type and behold A working WinPE running on a VMware Virtual Machine. Incase you were wondering why I was trying to WinPE on a Virtual Machine. Its because I'm using it to trouble shoot sysprep configuration problems I've been having building Virtual Machines for VMware Veiw. The VM will run into an error in sysprep and go into a endless reboot loop. However by booting to the WinPE  i can mount the local drive and read the sysprep log.

I'll post more on the sysprep issues later.

Using the E1000 Nic Type WinPE loads perfectly.

Tuesday, November 2, 2010

Period Slash for Local Account Login

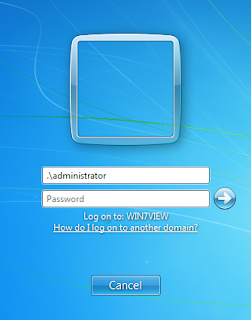
This Helpful Hint was just a little fact I had forgot. On Vista, Window 7 and Windows Server 2008 if the machine is bound to a domain the username is assumed to be on that domain. You can tell it to search for a local account by normally entering the "computername\username". However what I'd forgotten is that by putting ".\username" can be much faster and easier than typing in the full computer name.