If you are getting "Cannot create a file when that file already exists" when trying to create a printer port on windows by a specific name try a reboot. I had tried to find the port in WMI and the Registry thinking it got corrupted during an install but no luck finding it. Instead just a simple restart of the Machine solved it. (services restart of print spooler did not)
When I tried to create printer port GUI wizard and it would say complete but then it would problem a message box saying "Cannot create a file when that file already exists."
Posting this because I didn't find any results from Google on the issue. Ran into it using my powershell script to add printers.
Showing posts with label Windows 2008. Show all posts
Showing posts with label Windows 2008. Show all posts
Thursday, April 14, 2011

Friday, April 8, 2011
Powershell API for Windows 2008 Print Queues and Ports
After you use this let me know what you think, this was one of projects I looked for and couldn't find before I started to write it.
Lately I've been working on migrating a Windows 2008 Print Server from from 32 bit to Windows 2008 R2 64bit. During this I've been cleaning up unused printers and ports as my other post suggested. Considering this print sever had nearly 500 printers installed worked on automating the process. Using Powershell I noticed many people complaining of poor integration of Powershell for Printer support. While I agree there should of been better built-in functions I was able to write every feature I wanted once I figured out how.
There where many posts online but none of them seemed to handle any issues that arrised. For example if you try and create a printer using [WMICLASS]"\\$ComputerName\ROOT\cimv2:Win32_Printer").createInstance() and call .Put() you may get the following error.
Exception calling "Put" with "0" argument(s): "Generic failure "
This is caused because one of the pramaters you are trying to use isn't valid. It doesn't say that but thats what it means. Frustrating to say the least. The cause of this for me it was the print driver didn't exist on the server. Because of this my InstallPrinters function first checks that all printers and ports first exist on the remote server. Little things like this make the entire process possible.
You really need to break down how you want to use this script it self as there are alot of useful functions depending on what your working on. In all the script can gather all the printer information about a given server; Its printers, ports and drivers and export that to a csv-file. It can try to ping all the ports and detect which are offline or bad DNS entires.
Here are most of the Powershell functions
Without further delay.
Lately I've been working on migrating a Windows 2008 Print Server from from 32 bit to Windows 2008 R2 64bit. During this I've been cleaning up unused printers and ports as my other post suggested. Considering this print sever had nearly 500 printers installed worked on automating the process. Using Powershell I noticed many people complaining of poor integration of Powershell for Printer support. While I agree there should of been better built-in functions I was able to write every feature I wanted once I figured out how.
There where many posts online but none of them seemed to handle any issues that arrised. For example if you try and create a printer using [WMICLASS]"\\$ComputerName\ROOT\cimv2:Win32_Printer").createInstance() and call .Put() you may get the following error.
Exception calling "Put" with "0" argument(s): "Generic failure "
At C:\Users\towlesd\Documents\My Dropbox\PrinterInformationfor2008.ps1:319 char:24
+     [void] $newprinter.Put <<<< ()
    + CategoryInfo          : NotSpecified: (:) [], MethodInvocationException
    + FullyQualifiedErrorId : DotNetMethodException
This is caused because one of the pramaters you are trying to use isn't valid. It doesn't say that but thats what it means. Frustrating to say the least. The cause of this for me it was the print driver didn't exist on the server. Because of this my InstallPrinters function first checks that all printers and ports first exist on the remote server. Little things like this make the entire process possible.
You really need to break down how you want to use this script it self as there are alot of useful functions depending on what your working on. In all the script can gather all the printer information about a given server; Its printers, ports and drivers and export that to a csv-file. It can try to ping all the ports and detect which are offline or bad DNS entires.
Here are most of the Powershell functions
- Create Printer
- Create Port
- Install Array of Printers
- Get Installed Drivers
- Get Install Ports
- Match printers with their ports in a csv-file
- Create csv files for any of this information
- migrate printers from one serevr to another
Without further delay.
###########################
#
#  Purpose: Printer API for Managing and migrating Printers
#  Created By: Chris Towles
#  Website: http://www.ChrisTowles.com
#  When: 04/08/2011
#  Version: 1.0
#  Change List
#
###########################

function Ping() {
 param ([string] $ComputerName)
 [bool] $Pingable = $false

 try {
  $ping = new-object System.Net.NetworkInformation.Ping
  $Reply = $ping.send($ComputerName, 1000)
  if ($Reply.status –eq “Success”) {
   $Pingable = $true
  }
 }
 catch { return "DNS Issue" }

 if ($Pingable) { return “Online” }
 else { return "Offline" }
}
function Get-Nslookup() {
 param ([string] $Name)

 $DNSInfo = "" | select "DNSName", "DNS_IP"
 $DNSInfo.DNSName = $null
 $DNSInfo.DNS_IP = $null

 try {
  #http://powershellmasters.blogspot.com/2009/04/nslookup-and-powershell.html
  $cmd = "nslookup " + $Name + " " + $ns + " 2>&1"
  $result = Invoke-Expression ($cmd) -ErrorAction SilentlyContinue -WarningAction SilentlyContinue

  $DNSInfo.DNSName = $result.SyncRoot[3]
  $DNSInfo.DNSName = $DNSInfo.DNSName.Split(":")[1]
  $DNSInfo.DNSName = $DNSInfo.DNSName.Trim()

  $DNSInfo.DNS_IP = $result.SyncRoot[4]
  $DNSInfo.DNS_IP = $DNSInfo.DNS_IP.Split(":")[1]
  $DNSInfo.DNS_IP = $DNSInfo.DNS_IP.Trim()
 }
 catch{
  $DNSInfo.DNSName = $null
  $DNSInfo.DNS_IP = $null
 }
 return  $DNSInfo
}
Function Get-Printers( ) {
 param ([string] $ComputerName  = ".") #sets "." as the default param if none is supplied

 Write-Host "Connecting to $ComputerName by WMI to gather printer information."
 Write-Host " Warning this may take a few minutes depending how many printers there are." -ForegroundColor Red

 $colItems = get-wmiobject -class "Win32_Printer" -namespace "root\CIMV2" -computername $ComputerName
 $count = $colItems.Count
 $pos = 0
 Write-Host "Found $count printers. Getting details on each now."
 $Printers = @()

 foreach ($objItem in $colItems) {
  write-progress -activity "Getting Information on each printer." -status "% Complete" -percentcomplete (($pos++/$count)*100);

  #creating a new object called $PrinterInfo
     $PrinterInfo = New-Object psobject

     $PrinterInfo | Add-Member NoteProperty Caption $objItem.Caption
     $PrinterInfo | Add-Member NoteProperty Comment  $objItem.Comment
     $PrinterInfo | Add-Member NoteProperty "Default"  $objItem.Default
     $PrinterInfo | Add-Member NoteProperty "DriverName" $objItem.DriverName
     $PrinterInfo | Add-Member NoteProperty "Local" $objItem.Local
     $PrinterInfo | Add-Member NoteProperty "Name" $objItem.Name
     $PrinterInfo | Add-Member NoteProperty "PortName" $objItem.PortName
     $PrinterInfo | Add-Member NoteProperty "PrinterStatus" $objItem.PrinterStatus
     $PrinterInfo | Add-Member NoteProperty "PrintProcessor" $objItem.PrintProcessor
     $PrinterInfo | Add-Member NoteProperty "Shared" $objItem.Shared
     $PrinterInfo | Add-Member NoteProperty "ShareName" $objItem.ShareName
     $PrinterInfo | Add-Member NoteProperty "Status" $objItem.Status
     $PrinterInfo | Add-Member NoteProperty "SystemName" $objItem.SystemName
     $PrinterInfo | Add-Member NoteProperty "WorkOffline" $objItem.WorkOffline

  $Printers += $PrinterInfo
 }
 write-progress -activity "Getting Information on each Port." -status "% Complete:" -percentcomplete 100 -Completed;
 return $Printers
}
function Get-PortInfo () {
 param ([string] $ComputerName  = ".",
   [bool]$CheckPorts = $true) #sets "." as the default param if none is supplied

 Write-Host "Connecting to $ComputerName by WMI to gather printer port information."
 Write-Host " Warning this may take a few minutes because its pinging each port." -ForegroundColor Red

 $colItems = get-wmiobject -class "Win32_TCPIPPrinterPort" -namespace "root\CIMV2" -computername $ComputerName
 $count = $colItems.Count
 $pos = 0
 Write-Host "Found $count printer ports. Getting details on each now."


 $Ports = @()

 foreach ($objItem in $colItems) {
  write-progress -activity "Getting Information on each Printer Port. " -status "% Complete:" -percentcomplete (($pos++/$count)*100);

  $PortInfo = New-Object psobject
  $PortInfo | Add-Member NoteProperty "ByteCount" $objItem.ByteCount
  $PortInfo | Add-Member NoteProperty "HostAddress" $objItem.HostAddress
  $PortInfo | Add-Member NoteProperty "HostAddressLink" ("http://" + $objItem.HostAddress + "/" )
  $PortInfo | Add-Member NoteProperty "Name" $objItem.Name
  $PortInfo | Add-Member NoteProperty "PortNumber" $objItem.PortNumber
  $PortInfo | Add-Member NoteProperty "Protocol" $objItem.Protocol
  $PortInfo | Add-Member NoteProperty "Queue" $objItem.Queue
  $PortInfo | Add-Member NoteProperty "SNMPCommunity" $objItem.SNMPCommunity
  $PortInfo | Add-Member NoteProperty "SNMPDevIndex" $objItem.SNMPDevIndex
  $PortInfo | Add-Member NoteProperty "SNMPEnabled" $objItem.SNMPEnabled

  if($CheckPorts) {
   $pingstring = Ping -ComputerName $objItem.HostAddress
   $PortInfo | Add-Member NoteProperty "Ping" $pingstring

   $DNSInfo = get-nslookup -Name $objItem.HostAddress
   $PortInfo | Add-Member NoteProperty "DNSName" $DNSInfo.DNSName
   $PortInfo | Add-Member NoteProperty "DNS_IP" $DNSInfo.DNS_IP
  }

  $Ports += $PortInfo
 }
 write-progress -activity "Getting Information on each Port." -status "% Complete:" -percentcomplete 100 -Completed;
 return $Ports
}
function Get-PrintersWithPort {
 param ( [array] $Printers,
   [array] $Ports  )

 $count = $Printers.Count
 $pos = 0
 $PrinterWithPortInfo = @()
 Foreach($Printer in $Printers) {

  write-progress -activity "Sorting Printers to their matching Ports." -status "% Complete" -percentcomplete (($pos++/$count)*100);
  $Port = $Ports | where {$_.Name -like ($Printer.PortName) }
  if($Port -ne $null) {
   $properties = $Port | Get-Member -MemberType NoteProperty

   foreach ($member in $properties )
   {
    $PropName = $member.Name
    $PropValue = $Port | Get-Member -MemberType NoteProperty ($member.Name)

    $PropValue = $PropValue.ToString().Split("=")[1]

    if($PropValue -match "null")
    { $PropValue = ""}

    $Printer | Add-Member NoteProperty ("Port_" + $Propname) $PropValue
   }
   $PrinterWithPortInfo += $Printer
  }
 }
 write-progress -activity "Sorting Printers to their matching Ports. Phase 3 of 3." -status "% Complete" -percentcomplete 100 -Completed;
 return $PrinterWithPortInfo
}
function Get-PortsWithPrinterAndOnline {
 param ( [array] $Printers ,
   [array] $Ports  )

 $PortsWithPrinterAndOnline = @()
 Foreach($Printer in $Printers) {
   $Port = $Ports | where { $_.Name -like ($Printer.PortName)  }
   if(($Port -ne $null ) -and ($Port.Ping -like "Online")) {
    $PortsWithPrinterAndOnline += $Port
   }
 }
 return $PortsWithPrinterAndOnline
}
function Get-PortsWithoutPrinters {
 param ( [array] $Printers ,
   [array] $Ports  )

 $PortsWithoutPrinters  = @()

 Foreach($Port in $Ports) {
   $Printer = $Printers | where { $_.PortName -like ($Port.Name) }
   if(($Printer -eq $null ) ) { #-and ($Port.Ping -like "Online")) {
    #Port Has no Printer
    $PortsWithoutPrinters += $Port
   }
 }
 $PortsWithoutPrinters = $PortsWithoutPrinters | sort -Property "Name"

 return $PortsWithoutPrinters
}
function Get-PrintersWithPortsOffLine {
 param ( [array] $Printers,
   [array] $Ports  )

 $PrinterWithPortOffLine = @()
 Foreach($Printer in $Printers) {
   $Port = $Ports | where { $_.Name -like ($Printer.PortName)  }
   if(($Port -ne $null ) -and ($Port.Ping -inotlike "Online")) {
    $PrinterWithPortOffLine += $Printer
   }
 }
 return $PrinterWithPortOffLine
}
function Get-PharosQueuesWithWInprintProcessor {
 param ( [array] $Printers )
 $WinPrint = @()
 Foreach($Printer in $Printers) {

  if($Printer.PrintProcessor -ine "WinPrint" -and $Printer.Name -like '*Q') {
   $WinPrint += $Printer
  }
 }
 return $WinPrint | sort "Name"
}
Function Get-InstalledPrinterDrivers () {
 param ( [string] $ComputerName = "." )

 $colItems = get-wmiobject -class "Win32_PrinterDriver " -namespace "root\CIMV2" -computername $ComputerName

 $PrintDrivers = @()
 foreach ($objItem in $colItems) {
  #creating a new object called $PrinterInfo
     $Driver = New-Object psobject
     $Driver | Add-Member NoteProperty Name $objItem.Name.Split(",")[0]
  $Driver | Add-Member NoteProperty Chip $objItem.Name.Split(",")[2]

  $PrintDrivers += $Driver
 }

 return $PrintDrivers
}
function Create-PrinterPort {
 param ( [string] $ComputerName  = ".", #sets "." as the default param if none is supplied
  [string] $PortName ,
  [string] $DNSName ,
  [int] $Protocol = 1,  #default of 1 for RAW
  [string]$Queue = $null,
  [string]$PortNumber =  "9100",
  [bool] $SNMPEnabled ,
  [string] $SNMPCommunity = $null)

 $newPort = ([WMICLASS]"\\$ComputerName\ROOT\cimv2:Win32_TCPIPPrinterPort").createInstance()
 $newport.Name = $PortName
 $newport.HostAddress= $DNSName #sometimes IP Address
 $newport.Protocol= $Protocol
 #Protocols possiable
 #1 = RAW, Printing directly to a device or print server.
 #2 = LPR, Legacy protocol, which is eventually replaced by RAW.

 if ($Protocol -eq 2 ) {
  $newport.Queue = $Queue
 }

 $newPort.PortNumber = "9100"
 $newport.SNMPEnabled = $SNMPEnabled
 if( $SNMPCommunity -ne $null ) {
  $newport.SNMPCommunity = $SNMPCommunity
 }

 Write-Host "Creating Port $PortName" -foregroundcolor "darkgreen"
 [void] $newport.Put()

}
function Create-CSVOutputFile {
 param ( [array] $CustomObject ,
   [String] $filename  )

 #writing file to
 Write-Host $filename
 $CustomObject  | Sort-Object "Name" | Export-Csv $filename

 #removes the top line as it just has #TYPE System.Management.Automation.PSCustomObject in it.
 get-content $filename |  select -Skip 1 |  set-content "$filename-temp"

 if (Test-Path "$filename-temp") {
  move  "$filename-temp" $filename -Force
 }
 else {
  Remove-Item "$filename"
  Write-Host "$filename was deleted because nothing was in it."
 }
}
function Create-Printer {
  Param (
  [string]$ComputerName = ".",
     [string]$PrinterName,
     [string]$DriverName,
     [string]$Location,
  [string]$ShareName,
  [String]$PortName,
     [string]$Comment
    )

 $newprinter = ([WMICLASS]"\\$ComputerName\ROOT\cimv2:Win32_Printer").createInstance()
 $newprinter.Drivername = $DriverName
 $newprinter.PortName = $PortName
 $newprinter.Shared = $true
 $newprinter.Sharename = $ShareName
 $newprinter.Location = $Location
 $newprinter.Comment = $Comment
 $newprinter.DeviceID = $PrinterName
 Write-Host "Creating Printer $PrinterName" -foregroundcolor "darkgreen"
 [void] $newprinter.Put()

 #Exception calling "Put" with "0" argument(s): "Generic failure "
 # This Means their is something wrong with a paramter, Most likely its the driver name
}
function Install-PrinterPorts {
 param ( [string] $ComputerName ,
   [array] $Ports  )

 Write-Host "Creating the following " $Ports.Count " printer ports on " $ComputerName
 foreach ($newport in $Ports) {

  [bool] $SNMPEnabled = $false
  if( $newport.SNMPEnabled -eq $true ) {
   $SNMPEnabled = $true
  }

  Create-PrinterPort -ComputerName $ComputerName `
   -DNSName $newport.HostAddress.ToUpper() `
   -PortName $newport.Name.ToUpper() `
   -PortNumber $newport.PortNumber `
   -Protocol $newport.Protocol `
   -SNMPEnabled $SNMPEnabled `
   -SNMPCommunity $newport.SNMPCommunity `
   -Queue $newport.Queue
 }
}
Function Install-Printers {
 param (
  [string] $ComputerName = ".",
  [array] $PrintersToCreate,
  [array] $PortsToCreate,
  [bool] $TestDriversAndPortsOnly = $false
 )
 $PrintersToInstall = @()
 $MissingPort = @()
 $MissingDriver = @()

 #Create the Remote Ports
 Install-PrinterPorts  -ComputerName $ComputerName -Ports $PortsToCreate

 #Check Print server for what ports and Printers are installed.
 $InstalledDrivers = Get-InstalledPrinterDrivers -ComputerName $ComputerName
 $InstalledPorts = Get-PortInfo -ComputerName $ComputerName -CheckPorts $false

 #I wished to have all the names in uppercase only.
 $Printer.PortName = $Printer.PortName.ToUpper()

 foreach($Printer in $Printers)
 {
  $DriverFound = $InstalledDrivers | where {$_.Name -eq $Printer.DriverName}
  $PortFound = $InstalledPorts | where {$_.Name -eq $Printer.PortName}

  if($DriverFound -eq $null) {
   #Write-Host ("The Print Driver isn't installed on the Destination Server" + $Printer.DriverName )
   $MissingDriver += $Printer.DriverName
  }
  elseif($PortFound -eq $null) {
   #Write-Host ("The Printer Port " + $Printer.Port_Name + " didn't existon the destination Server" + $Printer.DriverName )
   $MissingPort += $Printer.PortName
  }
  else{
   $PrintersToInstall += $Printer
  }
 }

 Write-Host ""
 Write-Host ("The following printer drivers are missing from " + $ComputerName )
 $MissingDriver | Sort | Get-Unique | ft -AutoSize

 Write-Host ""
 Write-Host ("The following printer port didn't exist on " + $ComputerName )
 $MissingPort | Sort | Get-Unique | ft -AutoSize

 Write-Host ""
 if ( $TestDriversAndPortsOnly -eq $false ) {
  foreach($Printer in $PrintersToInstall) {

   Create-Printer `
    -PrinterName  $Printer.Name  `
    -ComputerName $DestinationHost `
    -DriverName   $Printer.DriverName `
    -PortName    $Printer.PortName.ToUpper() `
     -ShareName    $Printer.ShareName  `
    -Comment    $Printer.Comment `
    -Location    ""
  }
 }
}

#################################################################################
#        MAIN           #
#################################################################################
Clear
$ComputerName = Read-Host "Enter the Print Server you wish to gather data about."
#$DestinationHost = "dvprintserv1"

[bool] $QueryData = $true
[bool] $OutputFiles = $true

if( $QueryData ) {
 #Gets all the information
 $Printers = @() | Get-Printers -ComputerName $ComputerName
 $Ports  = @() | Get-PortInfo -ComputerName $ComputerName
 $PrinterWithPortInfo = @() | Get-PrintersWithPort -Printers $Printers -Ports  $Ports
 $PortsWithoutPrinters = @() | Get-PortsWithoutPrinters -Printers $Printers -Ports $Ports
 $PrintersWithOffLinePort =   @() | Get-PrintersWithPortsOffLine -Printers $Printers -Ports  $Ports
}
#Used to migrate printers from one server to another.
#Install-Printers -ComputerName $DestinationHost -PrintersToCreate $Printers -Ports $Ports #-TestDriversAndPortsOnly $true

if($OutputFiles) {

 #Formated File Names
 $d = get-date
 $FileTime = "" + $d.Year + "-" + ("{0:D2}" -f $d.Month) + "-" + ("{0:D2}" -f $d.Day) + "-" + ("{0:D2}" -f $d.Hour ) + ("{0:D2}" -f $d.Minute)
 $PortsFilename = [String]::Format( "{0}_Ports_{1}.csv", $ComputerName, $FileTime )
 $PrintersFilename = [String]::Format( "{0}_Printers_{1}.csv", $ComputerName, $FileTime )
 $PrintersWithPortFilename = [String]::Format( "{0}_PrintersWithPort_{1}.csv", $ComputerName, $FileTime )
 $PortsWithoutPrintersFilename = [String]::Format( "{0}_PortsWithoutPrinters_{1}.csv", $ComputerName, $FileTime )
 $PrintersWithOffLinePortFileName = [String]::Format( "{0}_PrintersWithOffLinePort_{1}.csv", $ComputerName, $FileTime )

 #writing file
 [Environment]::CurrentDirectory = (Get-Location -PSProvider FileSystem).ProviderPath
 Write-Host ("Saving CSV Files at " + [Environment]::CurrentDirectory + " Named the following.")

 Create-CSVOutputFile $Printers -filename $PrintersFilename
 Create-CSVOutputFile $Ports -filename $PortsFilename
 Create-CSVOutputFile $PrinterWithPortInfo  -filename $PrintersWithPortFilename
 Create-CSVOutputFile $PortsWithoutPrinters  -filename $PortsWithoutPrintersFilename
 Create-CSVOutputFile $PrintersWithOffLinePort -filename $PrintersWithOffLinePortFileName
}
Here an example of some output.
Connecting to dvprintserv1 by WMI to gather printer information.
Warning this may take a few minutes depending how many printers there are.
Found 123 printers. Getting details on each now.
Connecting to dvprintserv1 by WMI to gather printer port information.
 Warning this may take a few minutes because its pinging each port.
Found 355 printer ports. Getting details on each now.
Saving CSV Files at C:\Users\towlesd\Documents Named the following.
dvprintserv1_Printers_2011-04-08-1211.csv
dvprintserv1_Ports_2011-04-08-1211.csv
dvprintserv1_PrintersWithPort_2011-04-08-1211.csv
dvprintserv1_PortsWithoutPrinters_2011-04-08-1211.csv
dvprintserv1_PrintersWithOffLinePort_2011-04-08-1211.csv
Tuesday, March 29, 2011
Powershell for Printer Information from Windows 2008
While working on migrating are campus print server to Windows 2008 R2 64 bit I wrote some Powershell scripts I figured others may find useful. I have other scripts I'll post in the future on creating and working with printers but this post is primarily about getting data about the printers and ports.
The end result is are three excel files (CSV).

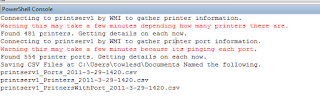
The end result is are three excel files (CSV).
- Contains all the information about the printers on the server.
- Contains the Ports information and tries to ping the Host Address to see if the port is valid
- Joins the data so that you can see the printer and its port information all together.
All the data is gathered via WMI so you'll need administrative access to the server your running it against. I used PowerGUI to write and test this and have been quite happy with the outcome. Considering our server has 500 printers on it takes about 5 minutes to run but lower numbers of printers run much faster.
The fact that the scripts pings all the ports and reports their status is a feature I should of written a long time ago.

Command Line Output

Picutre of the resulting Files

Thursday, February 24, 2011
Remove or Delete WSD Ports from Windows 2008
Heres a quick post about WSD ports in Microsoft Windows Server 2008.
Normally when you want to delete a printer port you must disconnect any printer using that port before you can delete it. Also deleteing the printer doesn't delete the port attached to it.
However if you try to delete a WSD port you get an error. I found several posts saying you couldn't delete them however the solution was very simple. WSD ports can be deleted by deleteing the printer that is attached to the WSD port.
If you have a WSD port you want to delete just create a Temp Printer that uses that WSD port and then Delete that Temp Printer.
It's counterintuitive to the norm but very workable.
Links
http://blogs.technet.com/b/askperf/archive/2008/02/11/ws2008-the-wsd-port-monitor.aspx
Normally when you want to delete a printer port you must disconnect any printer using that port before you can delete it. Also deleteing the printer doesn't delete the port attached to it.
However if you try to delete a WSD port you get an error. I found several posts saying you couldn't delete them however the solution was very simple. WSD ports can be deleted by deleteing the printer that is attached to the WSD port.
If you have a WSD port you want to delete just create a Temp Printer that uses that WSD port and then Delete that Temp Printer.
It's counterintuitive to the norm but very workable.
Links
http://blogs.technet.com/b/askperf/archive/2008/02/11/ws2008-the-wsd-port-monitor.aspx
Friday, November 12, 2010
Enable LDAP over SSL (LDAPS) on Windows 2008 Active Directory Domain
Today I did some work on getting our Dell Remote Access Cards (DRAC) to use Active Directory for authentication. The cards only supported LDAPS so after looking into it I realized my Domain Controller's didn't do LDAP over SSL (LDAPS).
So after some work on it here’s the solution to enable it. I found a few posts on line but they didn't seem to be written very clear for a environment with a Certificate Authority(CA) not on a Domain Controller (DC).
I found that all you really have to do is give the DC the correct type of certificate and it will automatically do LDAP over SSL. An important requirement here is that I didn’t want to force connections to use LDAP over SSL but rather just enable it to work if something wants to use it.
Environment
Microsoft Active Directory: Windows 2008
Certificate Authority: Windows 2008 Server that is not a Domain Controller
Solution
Enable The Domain Controller Authentication Certificate Template on the Certificate Authority
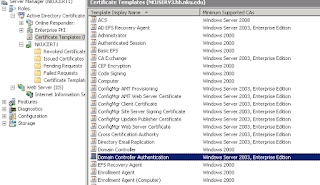
Starting with your Certificate Authority (CA) we need to make sure that the Domain Controllers (DC's) can enroll with the CA in order to obtain the correct Certificates. There is a Certificate Template for this that exists by default. To configure this Logon to the CA and open Server Manager and then expand the roles till you get the view below.
So after some work on it here’s the solution to enable it. I found a few posts on line but they didn't seem to be written very clear for a environment with a Certificate Authority(CA) not on a Domain Controller (DC).
I found that all you really have to do is give the DC the correct type of certificate and it will automatically do LDAP over SSL. An important requirement here is that I didn’t want to force connections to use LDAP over SSL but rather just enable it to work if something wants to use it.
Environment
Microsoft Active Directory: Windows 2008
Certificate Authority: Windows 2008 Server that is not a Domain Controller
Solution
Enable The Domain Controller Authentication Certificate Template on the Certificate Authority
Starting with your Certificate Authority (CA) we need to make sure that the Domain Controllers (DC's) can enroll with the CA in order to obtain the correct Certificates. There is a Certificate Template for this that exists by default. To configure this Logon to the CA and open Server Manager and then expand the roles till you get the view below.

- Expand the tree till you see the Certificate Templates folder and look for the Domain Controller Authentication the default existing template.
- Then expand the CA server and check if its listed under its Certificate Templates folder as well. If the Domain Controller Authentication is listed in both places then it exists and is enabled. If it isn't under the CA's Folder then we need to enable the Domain Controller Authentication Certificate Template.
- Right click Certificate Templates under the CA, Click New, then and Click Certificate Template to Issue. Select the Domain Controller Authentication and then click OK.
Thursday, November 4, 2010
Using Sysprep with CopyProfile in Windows 7 and Windows Server 2008
First rule of testing a sysprep unattened file:
Thou shall test your unattend xml file on a newly unconfigured OS install before blaming the file.
The Reason: Before becomeing a server admin I made my way by developing new and better ways to deploy computers on campus. I moved to the server team before Vista came out so my experitise was in mostly with Windows XP. So recently after 5hrs of trying to do the once simple task of copying the administrator profile to the default profile I can say that things have changed. First let me setup what I'm working on, then share what can so you can avoid the problems I had.
The Goal: To use the <CopyProfile> option with sysprep to copy the Administrator profile to the default profile on a Windows 7.
The Problems: Things that can go wrong will.
The only truly supported way to copy a profile in Windows 7 to the default to do so by using Sysprep to do the Profile copy. If you search the web many people list ways but they shouldn't be used in real production environments and require manually editing the registry files. And honestly you don't should need these shortcuts as doing the copy via sysprep is easy enough if you follow this post.
First configure the Administrator Profile to the way you want. Make sure you opened most programs and everything works. I'm not going to go through the finer points of this and may make a post on it later and link to it here.
Thou shall test your unattend xml file on a newly unconfigured OS install before blaming the file.
The Reason: Before becomeing a server admin I made my way by developing new and better ways to deploy computers on campus. I moved to the server team before Vista came out so my experitise was in mostly with Windows XP. So recently after 5hrs of trying to do the once simple task of copying the administrator profile to the default profile I can say that things have changed. First let me setup what I'm working on, then share what can so you can avoid the problems I had.
The Goal: To use the <CopyProfile> option with sysprep to copy the Administrator profile to the default profile on a Windows 7.
The Problems: Things that can go wrong will.
- If your using a Virtual Machine that some one else built, you don't know what they did or didn't do. In my case my brother built a tweaked Virtual Machine for Windows 7 stripped for speed. At some point he made the profiles/registry gods upset and sysprep no longer can listen to the <CopyProfile> option. See here for fix.
- You need to be able to read the local disk Incase the box will not boot or in this case gets stuck in a sysprep endless boot. I can't over state this. You can not see whats wrong with sysprep with out this. In my case I used a network PXE server with WinPE loaded with VMware Drivers. However note that PXE doesn't work with VMXNET3 and ESX 4.1 as of yet. See my other post.
- Sysprep isn't your friend, its more of the coworker you have to deal with. Learn to get along with it as its not going anywhere.
The only truly supported way to copy a profile in Windows 7 to the default to do so by using Sysprep to do the Profile copy. If you search the web many people list ways but they shouldn't be used in real production environments and require manually editing the registry files. And honestly you don't should need these shortcuts as doing the copy via sysprep is easy enough if you follow this post.
First configure the Administrator Profile to the way you want. Make sure you opened most programs and everything works. I'm not going to go through the finer points of this and may make a post on it later and link to it here.
Tuesday, November 2, 2010
Period Slash for Local Account Login
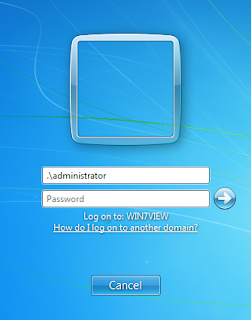
This Helpful Hint was just a little fact I had forgot. On Vista, Window 7 and Windows Server 2008 if the machine is bound to a domain the username is assumed to be on that domain. You can tell it to search for a local account by normally entering the "computername\username". However what I'd forgotten is that by putting ".\username" can be much faster and easier than typing in the full computer name.

Tuesday, October 26, 2010
Install Steps for Microsoft Live@Edu SSO (Single-Sign-On) on Windows 2008 and WIndows 2008 R2
I while back i wrote some quick notes on the install steps to setup Microsoft Live@Edu SSO on a Windows 2008 R2. Some of the details may be different for you enviroment and a later issues i point out may be resolved since i was working with Version 4.1. I worked on this when I wrote http://liveatedussolinks.codeplex.com/ which allows SSO to login to Outlook Live and Live@Edu from SharePoint 2010. (I really need to upload the newest version of the SharePoint WebPart to both Sites but email me if you want a copy.)
Download Newest Version - Microsoft Live@Edu SSO and extract contents on the server we're going to be configuring and working from the same server do the following.
Import the Microsoft Certificate
Create Web Site
UPDATE 4-3-2012 : Sorry I've not been updating this project in a bit, I've actually rewrote this project and am looking around at creating or sale this SSO Login with support for a small fee but honestly don't know a good way of going about it. Anyone have an idea about how to go about this? Is it wise to do it your self or sell it to someone and let them resale it.I assume you've already registered your site to use SSO with Microsoft and they have sent you a certificate to use. I had to work with them as the cert they sent was invalid but hopefully you have better luck than I did and it works on the first request. If you need it you must setup with Microsoft the Windows LiveID SSO Kit. if you haven't already done this go to the Live@edu service management portal (http://eduadmin.live.com/), select Single sign-on. Then, click Request SSO Support to request the SSO SDK and certificate.
Download Newest Version - Microsoft Live@Edu SSO and extract contents on the server we're going to be configuring and working from the same server do the following.
Import the Microsoft Certificate
- Open MMC
- add snap in for Certificates
- chose computer account - local computer
- Navigate to Personal Certs
- Import the Cert Microsoft sent you for SSO
- mark as exportable, no password needed
- If imported a sapipartner.com entry should be added
- Right click the sapipartner.com and chose all tasks
- Manage Private keys
- add everyone full and give full access
- Need to sit down and figure out what is actually needed but this works
- From the extracted folder Install rps64.msi
- Warning: You must launch the msi with compatibility mode.
- Chose Production
- RPSServer.xml
- leave rpscomponent.xml blank
- leave sitename and everything else blank
- leave DEK and everything else blank
- NT AUTHORITY\NetworkService
- navigate to c:\Program Files\Microsoft Passport RPS
- copy RPSNetwork.xml to c:\Program Files\Microsoft Passport RPS\config
- Test Microsoft Passport RPS by running rpsDiag.exe
- click run
- All should be green, if not use the errors and fix till they are all Sucessfull
- open a Administrative command window to "C:\Program Files (x86)\Windows Resource Kits\Tools"
- Run the following
winhttpcertcfg.exe -g -a %ComputerName%\NetworkService -c LOCAL_MACHINE\My -s sapipartner.com
- Check that granting private key access for account NT Authority\NetworkService works
Create Web Site
- Install Web Services Role (IIS)
- Enable management Features
- Copy SSOPortal folder from Microsoft Live@Edu SSO extracted folder to C:\inetpub\wwwroot\
- Edit web.config - This is very important, there are notes that come in the Microsoft Live@Edu SSO extracted folder on what to change.
- Open IIS Manager
- Convert SSOPortal an application.
- Change the authentication to windows
- Disable anonymous Authentication
Warning: The following was only needed for Windows 2008 R2
- Open MMC (fix only for 2008 R2)
- add snap-in "Component Services"
- open till DCOM Config
- open properties on RPSSvc
- Under Security
- Give everyone full access
- Need to sit down and figure out what is actually needed but this works
Tuesday, October 19, 2010
Emulex 10 Gb CNA Crash - VMware and Windows
Update 1 - 04-08-2011 - VMware and Emulex now has a stable driver so theres no need in the beta driver.
We recently purchased Emulex 10 Gb CNA Cards for our new and existing VMware ESX Hosts and other large bandwidth servers. However we have seen nothing but problems with them crashing. After going round and round with VMWare, Cisco and Emulex we seem to have a stable build using a beta driver build we received from Emulex. This driver is only for the Ethernet controller on the card; in other words the be2net driver.
The problem seems to be with any version of the driver that has TCP Offload enabled. On the windows drivers we were able to configure the driver to disable this "Feature" which made the cards stable. On Vmware the drivers at current time only go up to VMware ESX/ESXi 4.x Driver CD for ServerEngines BladeEngine 10Gb Version "2.102.440.0" released on 2010/09/16. Problems you'll notice with this driver is if you change VLAN ID’s on a Network the ESX host will crash with a purple screen. Other problems will arise like hosts would lose the ability to talk to each other intermittently. However the switching the VLAN ID case was used to case the crash on demand for testing.
Our network guy pushed and we were able to get a beta release of the be2net driver. The build is version be2net-2.102.474.1 and from what we read in it the notes we got. This build allows you to enabled and disable vlan offloading with the default being disabled. Like the Windows driver we worked with on windows 2008 R2 that appears to be all that’s needed to make the driver stable.
Below is the screen shot of the ESX with the beta unsigned driver running an ESX Host that’s been stable for last 2 weeks and pasted every test we could think of to try.

We also tested a QLogic 10 Gb CNA since we considered switching to it however it had the same issue with crashing with TCP offload. We wonder if they are both using the same chip.
No fix of yet would allow us to enable this feature.
Update 1: Newer Beta Drivers Listed
We recently purchased Emulex 10 Gb CNA Cards for our new and existing VMware ESX Hosts and other large bandwidth servers. However we have seen nothing but problems with them crashing. After going round and round with VMWare, Cisco and Emulex we seem to have a stable build using a beta driver build we received from Emulex. This driver is only for the Ethernet controller on the card; in other words the be2net driver.
The problem seems to be with any version of the driver that has TCP Offload enabled. On the windows drivers we were able to configure the driver to disable this "Feature" which made the cards stable. On Vmware the drivers at current time only go up to VMware ESX/ESXi 4.x Driver CD for ServerEngines BladeEngine 10Gb Version "2.102.440.0" released on 2010/09/16. Problems you'll notice with this driver is if you change VLAN ID’s on a Network the ESX host will crash with a purple screen. Other problems will arise like hosts would lose the ability to talk to each other intermittently. However the switching the VLAN ID case was used to case the crash on demand for testing.
Our network guy pushed and we were able to get a beta release of the be2net driver. The build is version be2net-2.102.474.1 and from what we read in it the notes we got. This build allows you to enabled and disable vlan offloading with the default being disabled. Like the Windows driver we worked with on windows 2008 R2 that appears to be all that’s needed to make the driver stable.
Below is the screen shot of the ESX with the beta unsigned driver running an ESX Host that’s been stable for last 2 weeks and pasted every test we could think of to try.

We also tested a QLogic 10 Gb CNA since we considered switching to it however it had the same issue with crashing with TCP offload. We wonder if they are both using the same chip.
No fix of yet would allow us to enable this feature.
Update 1: Newer Beta Drivers Listed
Tuesday, October 12, 2010
How to Encrypt VMware VM running Windows 2008 R2 with Microsoft Bitlocker
A piece of software at work has a HIPAA requirement that the drive is to be encrypted. No problem right, we use Microsoft BitLocker on our windows severs and PC’s. So in keeping with that I worked out a way to do so with our VMware Virtual Machines but it should work with any type of Virtual Machines as well.
The Goal: To encrypt windows 2008 using the built in Microsoft BitLocker.
The Problem: Since we are working with a Virtual Machine there isn’t a TPM (Trusted Platform Module) Chip. This is normally where Bit locker would store the encryption key.
The Solution: BitLocker can use a USB or floppy drive to store the key in the case the hardware doesn’t have a TMP chip on board. That fact alone doesn’t do a lot of good with a VM because the USB would would always have to be mounted to the VM. However we can use that feature to instead point it to a disk volume we create to store the encryption key.
A few details about my environment:
Next we will need a volume to store the encryption key since our VM doesn’t have a TPM Chip. You should add a additional Hard Drive to the VM and format it NTFS and mount it. I made mine 100 MB and labeled it “EncryptionKey”. Another method would be to shrink the OS Volume by 100MB and create the volume from the freed up space however this shouldn’t be done as resizing the drive and extending the volume is then prevented. It’s better to just create a the new Virtual hard drive.
After the drive is added, formated and labeled open the Run prompt and launch "gpedit.msc", We need to set the Group Policy Object (GPO) settings to enable BitLocker to store the key on a drive instead of TPM and to make sure it takes a backup of the key and stores it in AD.
The Goal: To encrypt windows 2008 using the built in Microsoft BitLocker.
The Problem: Since we are working with a Virtual Machine there isn’t a TPM (Trusted Platform Module) Chip. This is normally where Bit locker would store the encryption key.
The Solution: BitLocker can use a USB or floppy drive to store the key in the case the hardware doesn’t have a TMP chip on board. That fact alone doesn’t do a lot of good with a VM because the USB would would always have to be mounted to the VM. However we can use that feature to instead point it to a disk volume we create to store the encryption key.
A few details about my environment:
- VMware ESX 4.1 Hosts
- VM with Windows 2008 R2 already running and ready to encrypt.
- Our domain as already been extended to store BitLocker keys (see here for more.)
- Our GPO policy that Bit Locker requires TPM to backup to AD DS.
Next we will need a volume to store the encryption key since our VM doesn’t have a TPM Chip. You should add a additional Hard Drive to the VM and format it NTFS and mount it. I made mine 100 MB and labeled it “EncryptionKey”. Another method would be to shrink the OS Volume by 100MB and create the volume from the freed up space however this shouldn’t be done as resizing the drive and extending the volume is then prevented. It’s better to just create a the new Virtual hard drive.
After the drive is added, formated and labeled open the Run prompt and launch "gpedit.msc", We need to set the Group Policy Object (GPO) settings to enable BitLocker to store the key on a drive instead of TPM and to make sure it takes a backup of the key and stores it in AD.
 |
| Local Group Policy being used to edit BItLocker Settings |
Subscribe to:
Posts (Atom)